
Building A Static Website - Part 1: Learning Jekyll
This tutorial will first explain the reasoning behind using a static site generator, specifically Jekyll, before providing a step-by-step guide on how to create your first static website using Jekyll. You can find a working example of the final product here as well as the complete code within this repository.
This is the first article in the static website building series.
Prerequisites: Familiarity with using your operating system’s terminal, an understanding of how the web works, and some knowledge of HTML, CSS, and JavaScript is recommended. Feel free to check out the Understanding The Web article to gain some insights on how the web works.
A Static Website
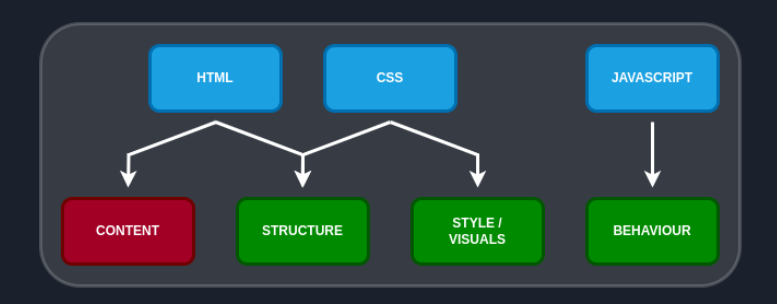
In the Understanding The Web we discussed the basics of the web. HTML, CSS, and Javascript were also briefly mentioned. You may have heard of these three software langauges previously. These languages are the backbone of websites. They are what we call client-side, or front-end, web languages. They each have a specific purpose. HTML is used for both the websites content and structure. CSS is used for both structure and style/visuals. Javascript is responsible for the client-side behaviour.
To create a static website from scratch we would have to:
- Write HTML, CSS, and Javascript to get the write content, structure, and website behaviour.
- Choose a file hosting service. For example,
- An AWS instance (this would cost money), or
- Use your own PC (opening your PC up to the world might bring about some security concerns).
- Deploy our website to the file hosting service.
- Setup a web-server, like NGINX. This would include:
- Setting up security certificates (SSL) as we probably would want HTTPS; and
- Listening to requests.
- Register and setup up the domain with a DNS service.
- Establish some form of traffic reporting (optional).
- And possibly a few other steps.
As you can see there are quite a lot of steps, especially, when you probably want to get up and running quickly and want to focus on content. We could make our life a little easier by using a website template that already has HTML, CSS, and Javascript alongside Github Pages. However, even then we are still writing in HTML, which still isn’t as natural as writing a word document. We would also still have to do pagination, navigation bars, latest post links, etc. This can make it cumbersome and quite painful. Instead we could use what is known as a static site generator.
Note: You could also use a website builder such as Wix or WordPress. Most domain name registraion services, such as GoDaddy, provide website building capabilities. However, what if we want to be cheap and not have to pay for the service?
Static Site Generators
A static site generator is a script(s) that takes in content and templates, and you guessed it, generates a static website (HTML, CSS, Javascript). They allow us to focus primarily on the content rather than style and behaviour. They still have their disadvantages, but overall they are pretty good, and work well with services such as Github Pages. There are plenty of static site generators.

Jekyll
Jekyll is one of many static site generators. However, Github Pages utilises Jekyll and hence why we will be using it today. Jekyll uses the Ruby programming language, but don’t worry, we don’t need to actually write anything in Ruby. Jekyll takes in Markdown files (our content), plus templates consisting of Liquid, HTML, CSS, and Javascript to generate static websites.
Ruby 101
Ruby is a programming language. In the Ruby language you will hear a lot about Gems. Gems are reusable pieces of code. If you know Python or C/C++ you might think of these as modules or libraries. A Gemfile is a list of gems required by a project, similar to a Python requirements file or a set of included C/C++ header files. There is a special Gem called Bundler. Bundler is like Python’s pip, it is used to install a gemfile, but can also be used to execute Gems using the current environment (like a virtual environment). More info on Bundler and Gemfiles can be found in later in the article.
Creating Your First Website
Okay, that was a really quick intro into the tools we will be using and why we are using them. However, I always find it best to dive in to start learning. So let’s get started in creating a basic static website. The result won’t be aesthetically pleasing, however, it is important you work through these steps as they introduce you to the concepts within Jekyll and will ultimately help you in the long run. The next article will help you beautify your website using themes, but understanding themes, can be quite difficult if you don’t understand the basics. So I encourage you to work through these steps carefully, making sure you take your time.
Note: Code is included for you to copy and paste into a terminal to help speed up the process. Or if you aren’t familiar with the terminal on your operating system, use whatever process you wish to perform the steps.
Install Ruby and Jekyll
Visit the Jekyll Installation page and install Ruby, Jekyll, and Bundler as per the instructions for your operating system. You will know you have succeeded once you can run jekyll -v in a terminal and it returns the Jekyll version installed.
Creating Your First Page
- Create a directory to hold all the files and navigate into that directory. We refer to this directory as the
rootdirectory. You can call it whatever you would like.
-
mkdir <my-website-folder> && cd <my-website-folder> -
mkdir <my-website-folder> && cd <my-website-folder> -
mkdir <my-website-folder> && cd <my-website-folder>
- Create a gemfile.
-
touch gemfile -
touch gemfile -
copy Gemfile+
- Add the following to the Gemfile. We will talk about the Gemfile and its contents later.
-
source "https://rubygems.org"
gem "jekyll", "~> 4.3.2"

# If you are on a Windows machine will also need to add
# the following lines, adding them on Ubuntu and MacOS machines
# isn't required but shouldn't hurt
gem "webrick", "~> 1.7"
gem 'tzinfo-data', platforms: [:mingw, :mswin, :x64_mingw]
- Install the gems.
-
bundle install -
bundle install -
bundle install
- Create an index markdown file
index.mdto act as the homepage.
-
touch index.md -
touch index.md -
copy index.md+
- Add the following code to index.md. Any code between the two sets of
---are what is called front matter. Jekyll will only process any markdown files that contain front matter.
-
---
---
# My Website
Welcome to my website!
- Locally build and serve your website. The
--livereloadwill automatically rebuild and serve the website if we make any changes to any of the content files. However, if our changes result in a bad state you may need to kill and restart the process.
-
bundle exec jekyll serve --livereload -
bundle exec jekyll serve --livereload -
bundle exec jekyll serve --livereload
You should now be able to go to the IP address and port outputted by the command above in a browser to view your website. Most likely the address will be 127.0.0.1:4000. If you cannot view it, see if there are any errors outputted by the above command, and work your way through them with the help of online sources.
Note: A locally served website is one that is only visible to you, and maybe your local network depending on your network settings. In a future article within this series we will talk about deploying your website and making it accessible by anyone with an internet connection.
Adding Additional Pages by using Layouts, Includes, and Data
An important aspect of Jekyll is using HTML templates. Jekyll calls these HTML templates layouts and will import your content (markdown) into these templates.
- Create a
_layoutsfolder in the root directory of the website and create a file calleddefault.html.
-
mkdir _layouts && touch _layouts/default.html -
mkdir _layouts && touch _layouts/default.html -
mkdir _layouts && copy _layouts/default.html+
- Add the following code to
_layouts/default.htmlfile. The{{ }}and{% %}are Liquid syntax for objects and tags respectively. Objects contain content to be displayed on the page. Tags create logic and control flow for templates. Here we are getting the page title and content objects, as well as including thenavigation.htmlfile (we will create this file in the next steps). Hold up, didn’t we say the whole point of using a static site generator was to get away from writing HTML, CSS, and Javascript? Well yes, we will see in Part 2 of this series we can leverage themes which already have HTML, CSS, and Javascript. However, for now we want to focus on Jekyll specifically rather than having to understand the nuances of a theme and Jekyll at the same time.
-
<!doctype html>
<html>
    <head>
        <meta charset="utf-8">
        <title>{{ page.title }}</title>
    </head>
    <body>
        {% include navigation.html %}
        <hr>
        {{ content }}
    </body>
</html>
- Create a folder called
_includesand add a file callednavigation.html. Includes are snippets that can be used elsewhere. This also helps avoid duplication. Here we will use it for navigation and include it, else we would have to write a navigation menu on each page.
-
mkdir _includes && touch _includes/navigation.html -
mkdir _includes && touch _includes/navigation.html -
mkdir _includes && copy _includes/navigation.html+
- Add the following code to
_includes/navigation.html.
-
<nav>
    {% for item in site.data.navigation %}
    <a href="{{ item.link }}">{{ item.name }}</a>
    {% endfor %}
</nav>
- In the code above we are referring to the object
site.data.navigation. Jekyll supports loading of data from various file types such as YAML, JSON, and CSV. These files must be located in the data directory. Create the_datadirectory and a file callednavigation.yml. More information on Jekyll variables can be found here.
-
mkdir _data && touch _data/navigation.yml -
mkdir _data && touch _data/navigation.yml -
mkdir _data && copy _data/navigation.yml+
- In the
_data/navigation.ymlfile add the following code. We will add additional links as we add pages to our site.
-
- name: Home
  link: /
- In
index.mdaddlayout: defaultto the front matter. Yourindex.mdfile should now look like this.
-
---
layout: default
---
# My Website
Welcome to my website!
- You should see
Homeat the top of your website. If not, you may need to rerun the jekyll build and serve command.
-
bundle exec jekyll serve --livereload -
bundle exec jekyll serve --livereload -
bundle exec jekyll serve --livereload
- Okay, now let’s see how easy it is too add pages. Create a page called
about_me.mdandprojects.mdin the root directory.
-
touch about_me.md && touch projects.md -
touch about_me.md && touch projects.md -
copy about_me.md+ && copy projects.md+
- Add the following code to
about_me.md
-
---
layout: default
---
# About Me
Here are some interesting facts about me.
- Add the following code to
projects.md
-
---
layout: default
---
# Prjects
Here are my projects.
- Add each page to the navigation bar by adding the appropriate details into
_data/navigation.yaml, the file shoud look something like this.
-
- name: Home
  link: /
- name: About Me
  link: /about_me
- name: Projects
  link: /projects
You should now have a website that has three pages, each with a navigation bar at the top. Hopefully, you can see the potential of building websites using Jekyll templates.
Blogging with Jekyll
Jekyll was originally created for blogging. As a result, Jekyll uses the special _posts directory along with a specific naming format for markdown files contained within the posts folder. Markdown files within the posts folder must use the format yyyy-mm-dd-<title>.md.
- Create a post directory and add two files, replacing
<date>with today’s date.
-
mkdir _posts && touch _posts/<date>-pub1.md && touch _posts/<date>-pub2.md -
mkdir _posts && touch _posts/<date>-pub1.md && touch _posts/<date>-pub2.md -
mkdir _posts && copy _posts/<date>-pub2.md+ && copy _posts/<date>-pub2.md+
- Add the following code to each post, changing the
<number>to 1 and 2 respectively.
-
---
title: Post <number>
---
The few lines will be the excerpt for post <number>.

This second paragraph has some more information.
- You may have noticed we didn’t include the
layoutkey within the front matter. We are going to create a new layout for our posts as we want them to look slightly different from our main pages. Create the file_layout/post.htmland add the following code. Here we are using front matter to inherit the default layout.
-
---
layout: default
---
<h1>{{ page.title }}</h1>

<p>
{{ page.date | date_to_string }}
{% if page.author %}
    - Written by {{ page.author }}
{% endif %}
</p>

{{ content }}
- Instead of adding
layout: postto each post, we can use a configuration file with predefined defaults. Create a_config.ymlfile in the root directory and add the following code. The first set here is saying that all files within the_postsdirectory should use the layoutpostand the default author is set toJane Bloggs. The second set is saying all pages, that aren’t contained within the posts folder, should use thedefaultlayout. If you wanted you could go and remove the layout key from our existing pages. Whenever, you make changes to the Jekyll configuration file you will need to restart the website server to see the affects. Additional information on front matter defaults can be found here.
-
defaults:
  - scope:
      path: ""
      type: "posts"
    values:
      layout: "post"
      author: "Jane Bloggs"
  - scope:
      path: ""
      type: "pages"
    values:
      layout: "default"
- The deployment article within this static website building series utilises Github Pages for serving your website. Github page servers are most likely not located within your time zone. This can lead to some odd things happening. You should also add your time zone to the configuration file. For example, if you are from Brisbane, Australia, you would add the following code
timezone: Australia/Brisbaneto_config.yml. You can find a list of time zones here. Remember, as we made changes to the configuration file you will need to reserve the website.
- Now we need a page to display and link to our individual posts. Create a new page, called
posts.mdin the root directory of the website and add the following code. Make sure you also add the appropriate entry into thenavigation.ymlfile. In the code below, you can see that we access the posts using the codesite.postswhich can be used, along with a for loop, to cycle through the posts and display the title and excerpt of each post.
-
---
---
 # My Posts

{% for post in site.posts %}
## [{{ post.title }}]({{ post.url }})
{{ post.excerpt }}
{% endfor %}
Okay that is enough about blogging. Posts are effectively a special type of what Jekyll calls Collections. We can use collections to our advantage when things belong to the same group, projects for example.
Using Collections
- To create a collection make a folder using the format
_<collection_name>and add this collection name to our configuration file under thecollectionskey. In this example, create a folder called_projectswithin the root website directory and add the following code to your configuration file.
-
collections:
  projects:
- In the projects folder create two markdown files called
project1.mdandproject2.md. You will notice that we don’t require a special naming convention like posts.
- Copy the following into each of the project markdown files, replacing the
<number>with the appropriate value.
-
---
title: Project <number>
project_url: https://jamesmount.tech/
description: A short description about the project.
---
- Change the
projects.mdfile to act as a “homepage” for your projects by creating a list linking to each project. We are assuming here that each project has a page outside of your website, for example it could be a link to a Github repository, or an article.
-
---
---
# My Projects

{% for project in site.projects %}
## [{{ project.title }}]({{ project.project_url }})
{{ project.description }}
{% endfor %}
Restart the local webserver, as we made changes to the configuration file, and see the changes. That is how easy it is to use collections and to quickly build lists of projects, publications, reviews, or whatever really. We could even go a step further and make a page for each project within our website, similar to a post. However, we won’t do that here.
Improving the Aesthetic
The website is fairly bland. There are no pictures, colours, or dynamic behaviour. We can create these using CSS, and JavaScript. Javascript, and CSS, as well as images, are known as assets and are placed in an assets folder. Jekyll utilise Sass which is an extension of CSS. We will utilise Sass to improve the aesthetic of the website.
- Create a folder called
_sassin the root directory and add amain.scssfile with the following code. This code will make the font size of each navigation bar item larger and all<h1>headings to be coloured green.
-
h1 {
    color: green;
}

.navbar-item {
    font-size: 1em;
}
- Create a directory called
assets, and then create acssfolder within the new assets folder. Copy the following code into a Sass file located atassets/css/styles.scss. Remember, Jekyll requires front-matter in order to know the file needs to be processed. This code tells Sass to look for a file calledmain.scsslocated in the_sassfolder.
-
---
---
@import "main";
- We need to reference this style sheet within our HTML layouts. Fortunately, as all sheets inherit from our default layout, we only need to add a single line. Add
<link rel="stylesheet" href="/assets/css/styles.css">between the<head>and</head>tags in_layouts/default.html. The_layouts/default.htmlshould now look like this.
-
<!doctype html>
<html>
    <head>
        <meta charset="utf-8">
        <title>{{ page.title }}</title>
        <link rel="stylesheet" href="/assets/css/styles.css">
    </head>
    <body>
        {% include navigation.html %}
        <hr>
        {{ content }}
    </body>
</html>
- Now update the
_includes/navigation.htmlto use the new CSS class. Change_includes/navigation.htmlto the following code.
-
<nav>
    {% for item in site.data.navigation %}
    <a href="{{ item.link }}" class="navbar-item">{{ item.name }}</a>
    {% endfor %}
</nav>
Feel free to restart the local website and view the changes. By using pre-existing themes we can leverage work already done by others to have an aesthetically pleasing website without having to spend vast quantities of time learning CSS and JavaScript. Thank you to those who have created the themes!
A Little More About Bundler and Gemfiles
A Gemfile is a list of dependencies required by your Ruby project. Bundler is a special Gem and acts like a package manager and virtual environment. If you are familiar with Python and Pip, you can think of a Gemfile as being similar to a requirements.txt and Bundler akin to Pip. However, we can also use bundler to execute commands using the current environment by prefixing the command with bundle exec. If you wish, do the following.
- Change the Gemfile to use a different version of Jekyll. For example, change it from
gem "jekyll", "~> 4.3.2"togem "jekyll", "~> 3.9.1". - Run
bundle install. - Now in a terminal navigate to the website root directory and
run bundle exec jekyll -v. You should getJekyll 3.9.1printed to your terminal. - Go up one level within your terminal and run
jekyll -v. You most likely will getJekyll 4.3.xprinted to your screen.
This little experiment shows how Bundler is used to run a specific version. Remember, to change your Gemfile back to use Jekyll 4.x. More information on Bundler and Gemfiles can be found in this article written by Moncef Belyami.
Going Further
Congratulations on creating your first static website. I know it is bland and it is only served locally, however, the next two articles in this series will overcome those minor details. This article was put together by reading the Jekyll documentation and its getting started guide. It is strongly encouraged you take some time to go through the Jekyll getting started guide as well the documentation.
If you are enjoying this three part series, please drop a comment, send a message, or share it with friends. If there is anything that you think can be improved, please drop a comment or send a message.
Leave a comment